bear anatomy

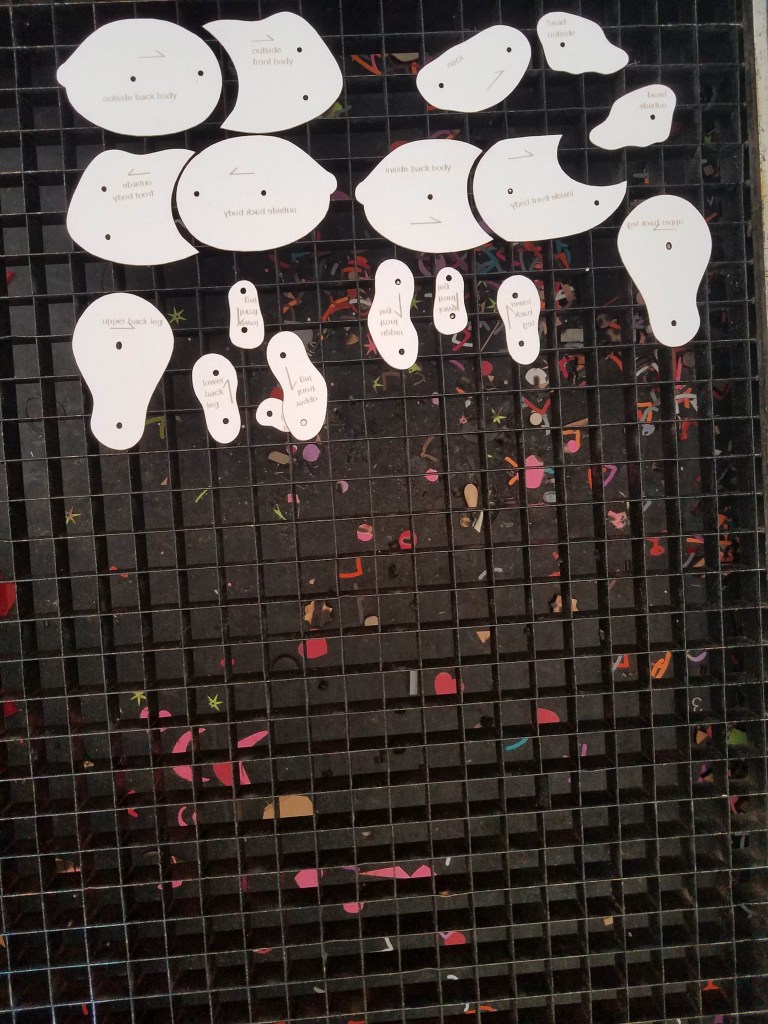
I mentioned a while back I had been working on making a jointed bear. the plan was to use the laser cutter to cut parts, and then hold them together using some kind of pins or tiny nuts and bolts so the legs and head would move in realistic ways. I was inspired to do this while looking at Laura Mathews Instagram feed – she makes extraordinary articulated animals, and they look like such excellent toys, both to build and to play with.

I started the process with a drawing, and some reference photos, and worked out a first draft, but it wasn’t quite right, and I wasn’t sure why.

I am embarrassed at how long it took me to think to look at actual bear anatomy, especially bone structure and musculature.

I did not look for bear anatomy, because I thought I understood quadruped anatomy, because I have drawn horses for my entire life. Any quadruped I see, I can map it roughly onto a horse, and sketch out something that looks perfectly reasonable. But it is not, in fact, reasonable.

To be technical, a horse is an ungulate. They walk about on their tippy-toes, and hide their (vestigial) thumbs up their legs somewhere. (Alice weirded out another visitor at the Harvard Museum of Comparative Zoology by crooning to a skeleton “ah my little ungulate, and where do you hide your thumbs…?”). Bears (and I realize this is a shock) are not ungulates. The scales have fallen from my eyes, and my bear models are hugely improved:

Also I am looking at all other mammals (squirrel, rabbit, chipmunk, cat), and also many non-mammal vertebrates (BIRDS!!! SO WEIRD!!!!), and thinking “whoa, that is not an ungulate either, I wonder what their bones look like???”

tl;dr Bears are not ungulates, and once you understand their skeleton better the models of them work SO MUCH BETTER. Also I think it hilarious that I was last month years old when I figured this out. There is always room for new knowledge. What have you learned recently?

more experiments, also I am MIGHTY!!

Many things have gone right today: Aerin and I found the bassoon guy after a very twisty drive into the edge of Boston. We got home from that safely too. I found my camera. I bought a new faucet for the kitchen sink, and removed the old one, and installed the new one, and with Red Kate's help even managed to remove the old sprayer spigot and replace it with the new one. I found a bunch of pieces for the Music Man set that will get built next weekend. I also have enough budget for a lot of them.

So here is yesterday's piece – a transparent piece on the back of the previous day's piece. I like the way the image is visible and less so depending on the intensity of the gesso that bled through the fabric.

jan 23

 Today's was one more reason I am mighty. I used an opaque transfer, and I wanted some of a transparent transfer over the top of it. So I ironed the transparent transfer face down on the opaque transfer…. and it STUCK. ARGH!! I tried to peel it off, and Red Kate tried to peel it off, and we agreed maybe water might help, and IT DID. (mighty, I tell you what!)

The end result is very misty and mysterious, and might still have a thin layer of paper over the top, but at least the image is visible. Which is better than I hoped for originally. (Really. I had a picture of the blank white back of the transfer paper, with pathetic little rips along the edges, all ready to post because I had already accomplished so much today I was willing to let that go. And then: win!!)

jan 24

negative results…

jan 21

Negative results are still results, and these two are good examples of refining ideas and making them work. I wanted to try transparent transfers onto fabric prepped with gesso. Yesterday's had a seam in it, so the contact with the iron was spotty, meaning it didn't peel well.

jan 22

Today's I tried putting the transfer down on the gesso while it was still wet (experimentation plus impatience) and ironed over the whole wet mess. I think the bubbly bits in the center were where the gesso steamed as it was cooling, and failed to stick to the transfer.

And I cannot find my camera, so these are taken with my phone. Which, when I say it that way, makes it kind of amazing, that my phone has a good enough camera to take pictures of what I'm doing, so I can edit them a little and post them here.

In other news: cold. Really, really cold, plus wind chill.

experiment

https://www.flickr.com/photos/dancingcrow/11862673375/player/ac816b3c74

Today was much warmer; all the way to just below freezing!

Thursdays are peaceful for me; I have lunch with Al, I have a Theater Tech meeting, and then I go home and do a good deal of nothing.

I was interested in trying a method to show how shiny and icy the ground is. I stitched a piece of plastic bag over an opaque transfer, and used marker to accentuate the shape and color of the tree. I think I can experiment with stitching on the plastic as well.


maple moon (wings)

july 30

via www.flickr.com

Still experimenting with gelatin printing.

I used a biscuit cutter to cut nice round circles out of the sheet of gelatin, and experimented using those as block for printing. Since my biscuit cutter is smaller than my circle-a-day circles, there is an unprinted edge that I wanted to accentuate.

I realized I have not yet posted links to my sources for gelatin printing.

My favorite, and primary source, is Linda Germain, and her blog Printmaking Without a Press. Linda does lovely, delicate work. She has answers to frequently asked questions, and videos on YouTube for those who want to see what she's talking about.

The Sketchbook Challenge blog also has a tutorial, and some pictures of the process.

I have really enjoyed having the gelatin block around to experiment with this month. It has been a lovely cool way to spend time working with fabric and color. I found it easy to get started. The gelatin block was fun to make and fun to hold (and fun to make wiggle! think industrail strength Jello Wigglers…) The materials I used were things I had on hand (white fabric, fabric paint) so the project scrimmage was small. 

It took me a lot of experimenting to come up with truly lovely things, making me uneasy until I hit my groove. I am also not entirely sure what to do with the pieces I don't love. I finally decided I'd hold them as potential blocks for stitching together into a lightweight coverlet or unfilled quilt. Or maybe I'll just give them away. It is a good year for it!


three failures means I’m done

I made a circle today, and it failed in different ways three different times.

1. the bleach doesn't make black threads white, it just made them kind of green

2. the white paint doesn't sit nicely on the black thread, it soaks in

3. even when the white paint has soaked in and dried, it is not waterproof, and it washed out when I tried to rinse off the water soluble stabilizer I'd constructed the feather on

And I could have stopped there, but instead I persisted, and then:

4. the water soluble stabilizer did not rinse out completely

5. which wouldn't matter except when reapplying the white paint that washed out and trying to remove some of the wetness by ironing the circle, the leftover stabilizer kind of crystallized on top, and then

6. when I tried to photograph it anyhow, just for completeness sake, the photo won't email, so I can't even show you the catastrophe that resulted

So. I'm done now.